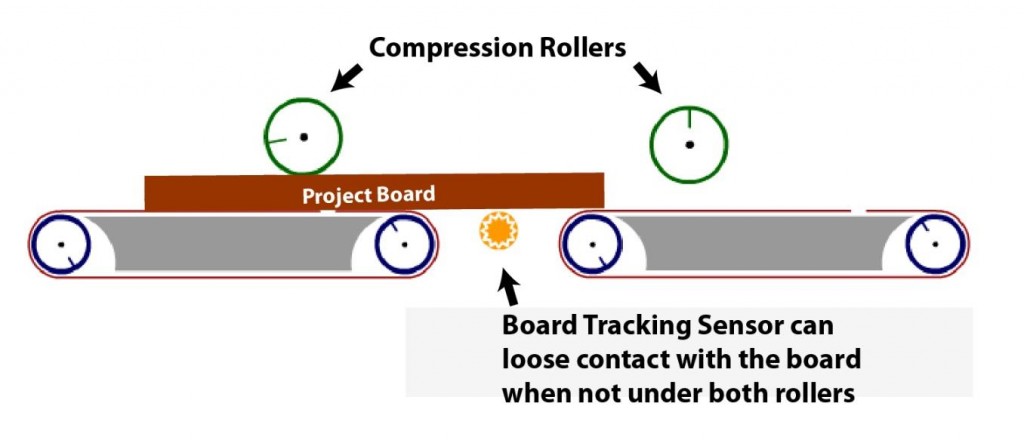
One of the most important items (and commonly missed) when getting started with the CarveWright CNC System is that the projects you carve need to be “Under the Rollers”. To do this, you need to make your actual project board 7” longer than the “virtual” board that appears in the Project Designer software when you are laying out a project. This creates a 3.5” margin on both ends of the board for the machine to keep the board under the compression rollers to achieve the highest quality and to avoid problems with the project.

When you load a project board and crank the machine down onto it, there are two compression rollers that engage the board and hold it into place. These 2 rollers are what you want to stay underneath. This means when the board is moving back and forth creating your project the board is always held down by both rollers. When a board comes out from under one of the rollers, the board will slightly “pop up” on the end that is no longer held down. This can result in several issues; the board can come off the board tracking sensor creating a miss-measurement or error, it can cause an unsightly “snipe”; or a change in elevation of the carving; or, in the case of cutouts, the added stress this can put on the cutting bit can cause the bit to break.

NOTE: If you don’t have the extra 7 inches and you select “YES” to stay under rollers, the machine will automatically shrink your project down to add the 3.5” to both ends. Your project will then be squished down, so the machine can claim the 3.5” on each end.
FOLLOW THESE STEPS TO MAKE SURE YOU ARE FOLLOWING THE 7” RULE.
- Make absolutely sure that your real board size is AT LEAST 7″ longer than the “virtual” or board in Designer. If your project in the software is 12” long, you need to load a 19” board into the machine.
- When setting up the project at the machine, it is easiest to stay under rollers by choosing the “Centered on Length” option. If you ever see an option on your LCD display for “scale project” you need to review your board dimensions. This means the machine has measured your board to be smaller than what is needed. Just remember, you don’t normally want the machine to resize your projects in any way at all.
- If you follow these steps, you will know that your project board will always be long enough to stay under the rollers. Since you now know you have a long enough board, you can answer NO to stay under rollers and it will result in the same outcome as choosing YES. If you follow the setup instructions outlined above, you can be assured of success when carving/cutting your projects. Some may ask, “If I make my board 7” longer than my Designer board, won’t that be wasting some wood?”. Yes, 3.5” on each end of the board is not used and can go into your recycle pile. There are methods of “jigging” your project to eliminate this waste. Several jigging methods are covered in this Tips & Tricks.
