Glossary
- Resolution – In graphics, resolution is referring to the number of dots (pixels) that are displayed per inch for an image.
- DPI – dots per inch.
Creating a New Project
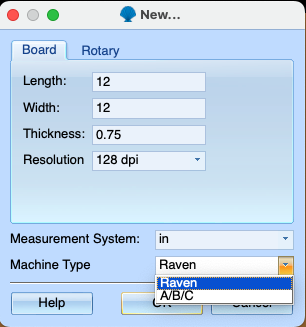
When creating a project, Designer will automatically detect what machines are registered to your account. It will only allow a project to be created for those types of machines. For example, if there is only A, B, or C models CarveWright machines registered, it will NOT allow the user to create a RAVEN project. If there is only a RAVEN model machine registered, it won’t show the A/B/C project type. Or if both types are registered, there is a selection box to choose which type of project.
Converting Projects
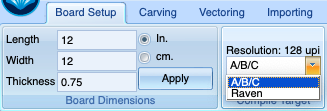
When opening an A/B/C type project, but you wish to carve it on a RAVEN machine, you will need to convert it. Under the Board Setup tab, there is a tool called Compile Target.

This tool shows you which type of project you are working with as well as the resolution settings for that project. It also allows you to convert the project from A/B/C to RAVEN. You cannot convert from RAVEN to A/B/C. When changing to a RAVEN type, click the APPLY button to make it take effect.
Project Resolution
When creating a RAVEN project, there are resolution options. A/B/C projects are always 128 dpi. The RAVEN options range from the normal carving resolution of 128 dpi to a very high resolution of 1024 dpi. These resolutions are useful for different types of projects, so it is important to understand when to use them.
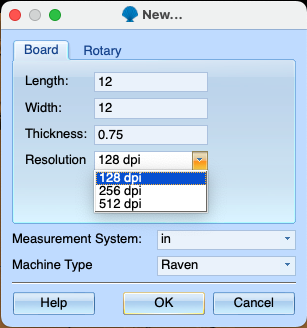
The default resolution is 128 dpi and it is ideal for most projects, especially if they are large. The higher resolutions are for doing small projects where a high level of detail is needed, especially with vector functions. An example of when you would want to use 512 dpi is If you want to do fine detail engraving work.
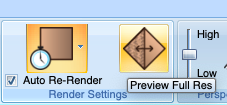
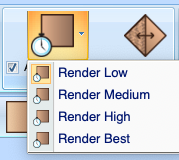
Render Settings
Higher resolutions can slow down the board rendering, so managing those settings can be crucial. Under the Board Setup tab, there are the Render Settings tools.

The drop down allows you to choose the level rendering you wish to work in. The lower the resolution, the faster the software will work.
Auto Re-Render describes the process of re-rendering the board after you move, zoom, apply tools, or otherwise change the board. It is checked by default, but in some cases where you have a lot of things on the board and it is running slow, unchecking this can help you get the designs in place before making it render.
The Preview Full Res button is for generating a full resolution preview when working in higher resolutions. This allows you to view the full details while rotating and zooming, but it turns off as soon as you engage with anything on the board.